# Management of employees
# Overview
An Employee is one of the core concepts of Linesbox. It represents a human who works at a company.
In Linesbox, an employee is not necessarily linked to a user. It’s really important to understand this. A user can have two different accounts in two different companies, with the same user account. This is because when a user creates an account in Linesbox, (s)he can actually join an existing company or create a new one.
A user is someone who has access to Linesbox, and when (s)he’s inside his account, (s)he’s an employee. However, an employee has to be created inside Linesbox by a user.
# Structure of the Employee profile page
The employee profile page is structured around 4 main tabs, some of them being invisible to employees without enough rights:
- the Presentation tab,
- the Work tab,
- the Performance tab,
- and the Administration tab.
# Manage employees
Employees are managed in Settings. Here are all the things you can do in Settings about employees:
- add and invite employees,
- lock an employee’s account,
- delete an employee.
# Add a new employee
To add a new employee, you need 3 pieces of mandatory information:
- first name,
- last name,
- and email address.
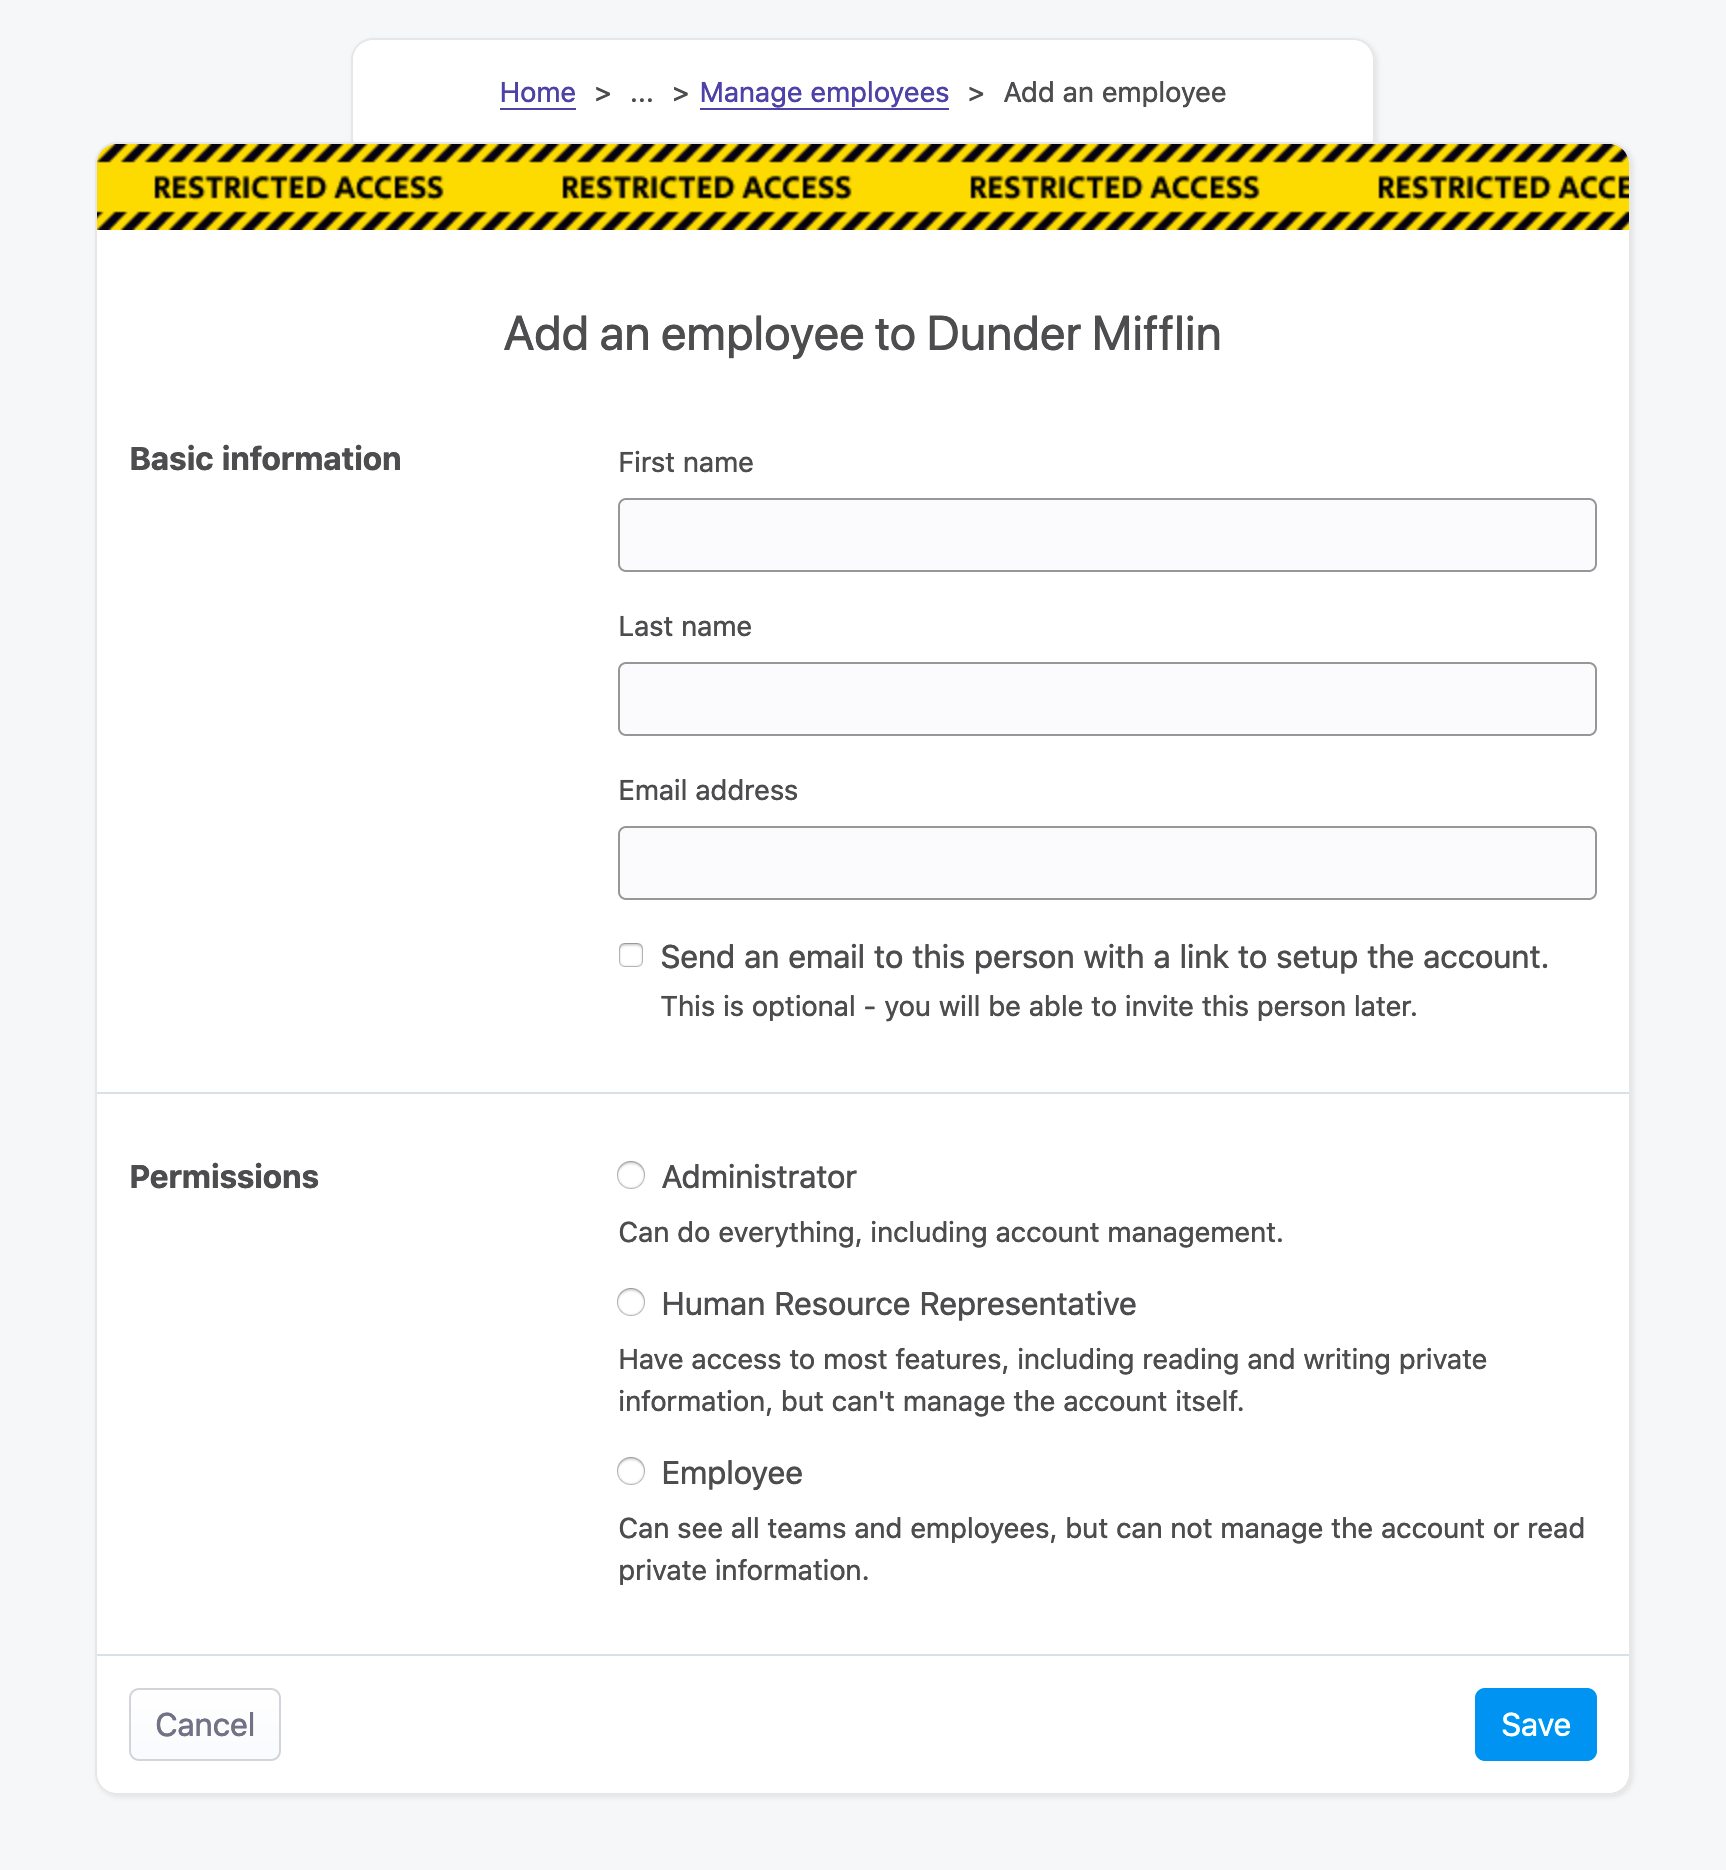
During this process, you can invite the employee by email. This will send an email to this employee, inviting him to create an account on Linesbox so (s)he actually use the software. You don't have to invite this person by email at this stage as you can do this later on.
If an employee is invited to create a user account, (s)he will be put in an Invited state. This state will serve as an indicator on the list of employees and will disappear as soon as the employee creates an account after being invited.
The final mandatory information is the role this employee will have. Refer to the documentation about roles to know more about what that means.
Rules
- Only employees with the HR or administrator roles can add an employee.
- The first name, last name and email address fields are limited to 255 characters.
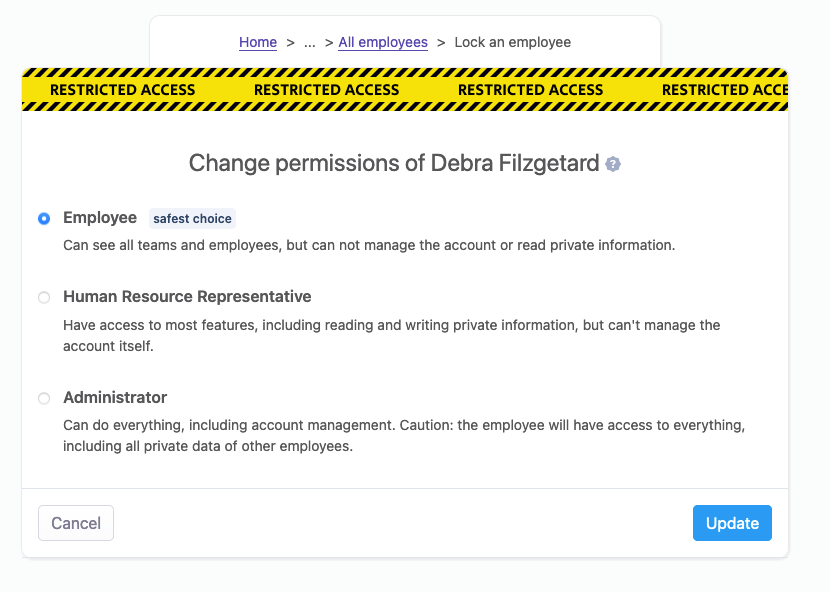
# Changing employee role (permission)
You can change the role/permission of an employee at anytime, and changes take effect immediately.
To update the role of an employee, head over to Settings > Add/remove existing employees > View all employees, then click on the Change permission link.

This will open a new window that lets you choose a new permission.
Rules
- Only employees with the HR or administrator roles can edit an employee's role.
- Changes are effective immediately.
- The logged user can't change its own permission.
# Importing employees
Linesbox lets you upload import employees. Right now, we support the upload of a CSV file.
The import process works as follow:
- You need to generate a CSV file that contains all the employees you want to import,
- You upload the CSV to Linesbox
- Linesbox will check the file for invalid entries
- Linesbox will ask you to confirm the import of the valid entries from the file.
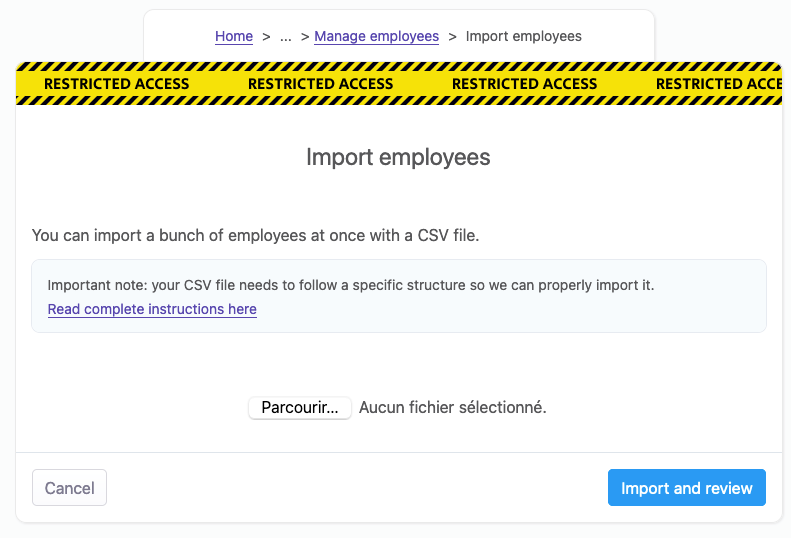
In Settings, under Manage Employees > Import, you can upload the CSV file.
It's really important to understand that the CSV file needs to follow a specific structure so we can properly import it. Otherwise, we can't know which row contains which information, leading to a lot of errors for the newly imported employees.
The structure of the file is this one (opens new window). Please grab the exact header to import your employees. The header should contain those exact 3 items, with the same naming:
First Name,Last Name,Email.
# Uploading a file
To upload a file, use the following screen to proceed.
Rules
- Before uploading the file, make sure the file follow the structure (opens new window) described above.
- Only CSV files can be uploaded here.
Once the file is uploaded, you will be redirected to the Review screen.
# Reviewing data before importing
Once a file has been uploaded, you need to review the data before we can import it to Linesbox.
This process is important because we don't want you to import invalid data without you knowing it.
This is how the Review screen looks like.
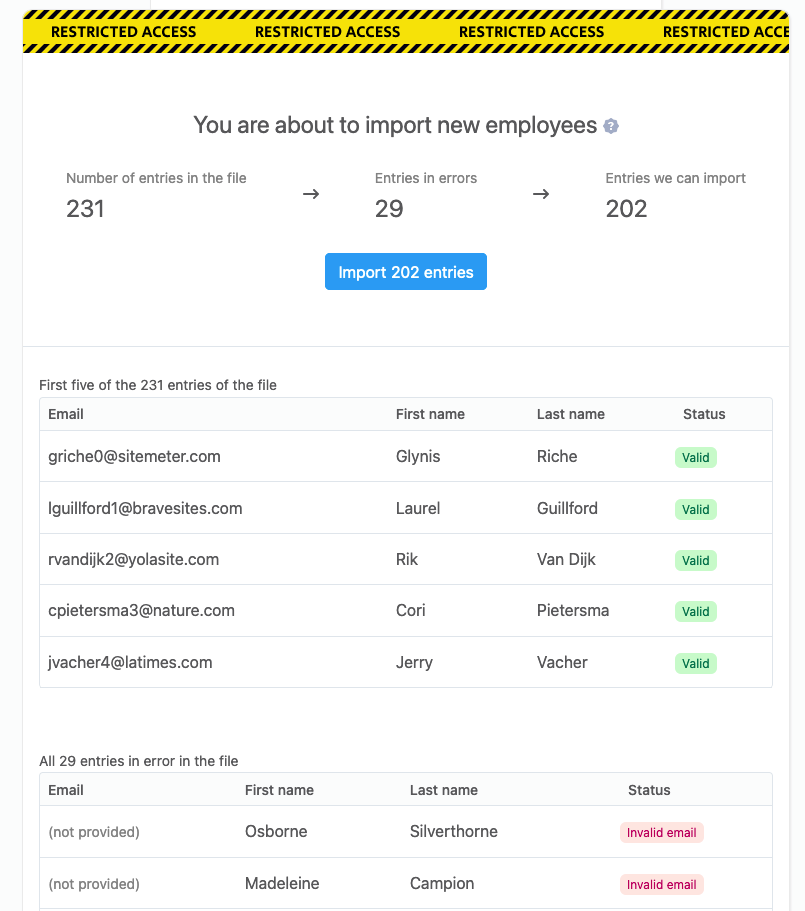
As you can see, this screen lists
- the total number of entries in the file,
- the number of entries we consider invalid - and therefore, that we can't import,
- the number of entries that we could import.
Once you are ready to proceed with the import, click on the Import button on this screen to start importing employees.
Before importing data, we will make sure that the email address associated with each entry
- is not already used by another existing employee,
- is not duplicated in the list you want to import.
Rules
- Only valid entries will be imported.
- The import can take quite some time - be patient, please.
- Employees that are imported will be regular employees (without special roles like administrator), and will not be invited by email to let them create an account themselves.
# Locking an employee
Instead of having to delete an employee, you can lock the employee’s account. Locking lets you prevent the employee from logging into his account, but keep track of everything this employee has ever done in Linesbox.
Locking an employee should be used in those cases:
- when an employee leaves the company,
- when an employee has been let go.
Locking is not a permanent action as you can unlock an account anytime if you change your mind.
Contrary to the deletion process, locking will not erase any data we have on the employee.
Rules
- Only employees with the HR or administrator roles can lock an employee.
- An employee can't lock himself, even with enough permissions. That means an administrator can't lock himself.
- Once an employee is locked, (s)he won’t appear in the search results anymore, nor in the list of employees in the application.
- (S)He won’t be listed in the list of team members if (s)he was part of a team.
- If the employee was a manager with expenses to validate, expenses will be moved to the accounting stage directly.
- If the employee had the accountant role, this role will automatically be removed.
- Current polls about the employee (if this employee was a manager) will be stopped immediately.
- (S)He will still appear in the list of employees inside Settings.
- All content written by the employee will still be available for everyone to see (work logs, answers to questions,…).
- The employee’s profile will still be accessible through direct links.
# Deleting an employee
Deleting an employee is an important decision. It will immediately destroy everything Linesbox knows about an employee, and will prevent the employee to log in to this Linesbox account. Those changes will be effective immediately.
There are two ways to delete an employee:
- either by choosing the employee on the list of employees in Settings,
- or by going through the employee's profile and select the Delete option in the upper right menu.
Once an employee is removed from Linesbox, everything that is linked to this employee is also removed. That means, for instance, if the employee was a team leader, the team won’t have a team lead anymore. All answers will be removed. All work logs will also be removed. And so on.
Rules
- Only employees with the HR or administrator roles can delete an employee.
- An employee can't delete himself, even with enough permissions (for instance, an administrator can't delete himself).
# Profile page
Every Employee, linked to a User or not, has a profile page. This page is public inside the company - meaning everyone in the company can see most of the information on this page (unless those who are not shown by default). All of the data entered by an employee on most screens in Linesbox appear on the profile page of the employee. Also, every action done on an employee appears on the Employee log.
# Employee birthdate
The birthdate is a private information. No one, except the own employee and employees with either the HR or the administrator roles, can see the complete birthdate. Viewing the complete birthdate means knowing the age of the person - and this is private.
However, in order to get to know your colleagues, it’s nice to know one’s day and month of birth. This is why when you visit the profile of someone in Linesbox, you will see the day and month of birth of this person.
# Hiring date
The hiring date is the date that the employee joined the company (or will join the company, if this date is in the future). Adding or updating this date can only be done by someone with either the HR or administrator role, and can’t be done by the employee.
Everyone in the company can see the complete date an employee joined the company.
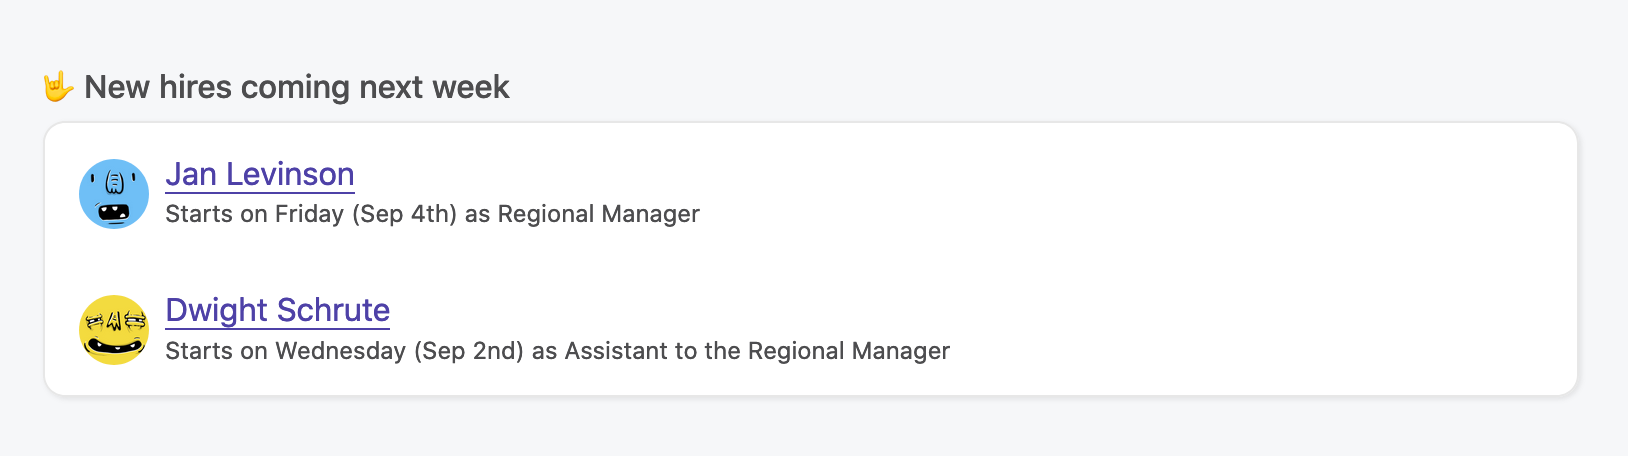
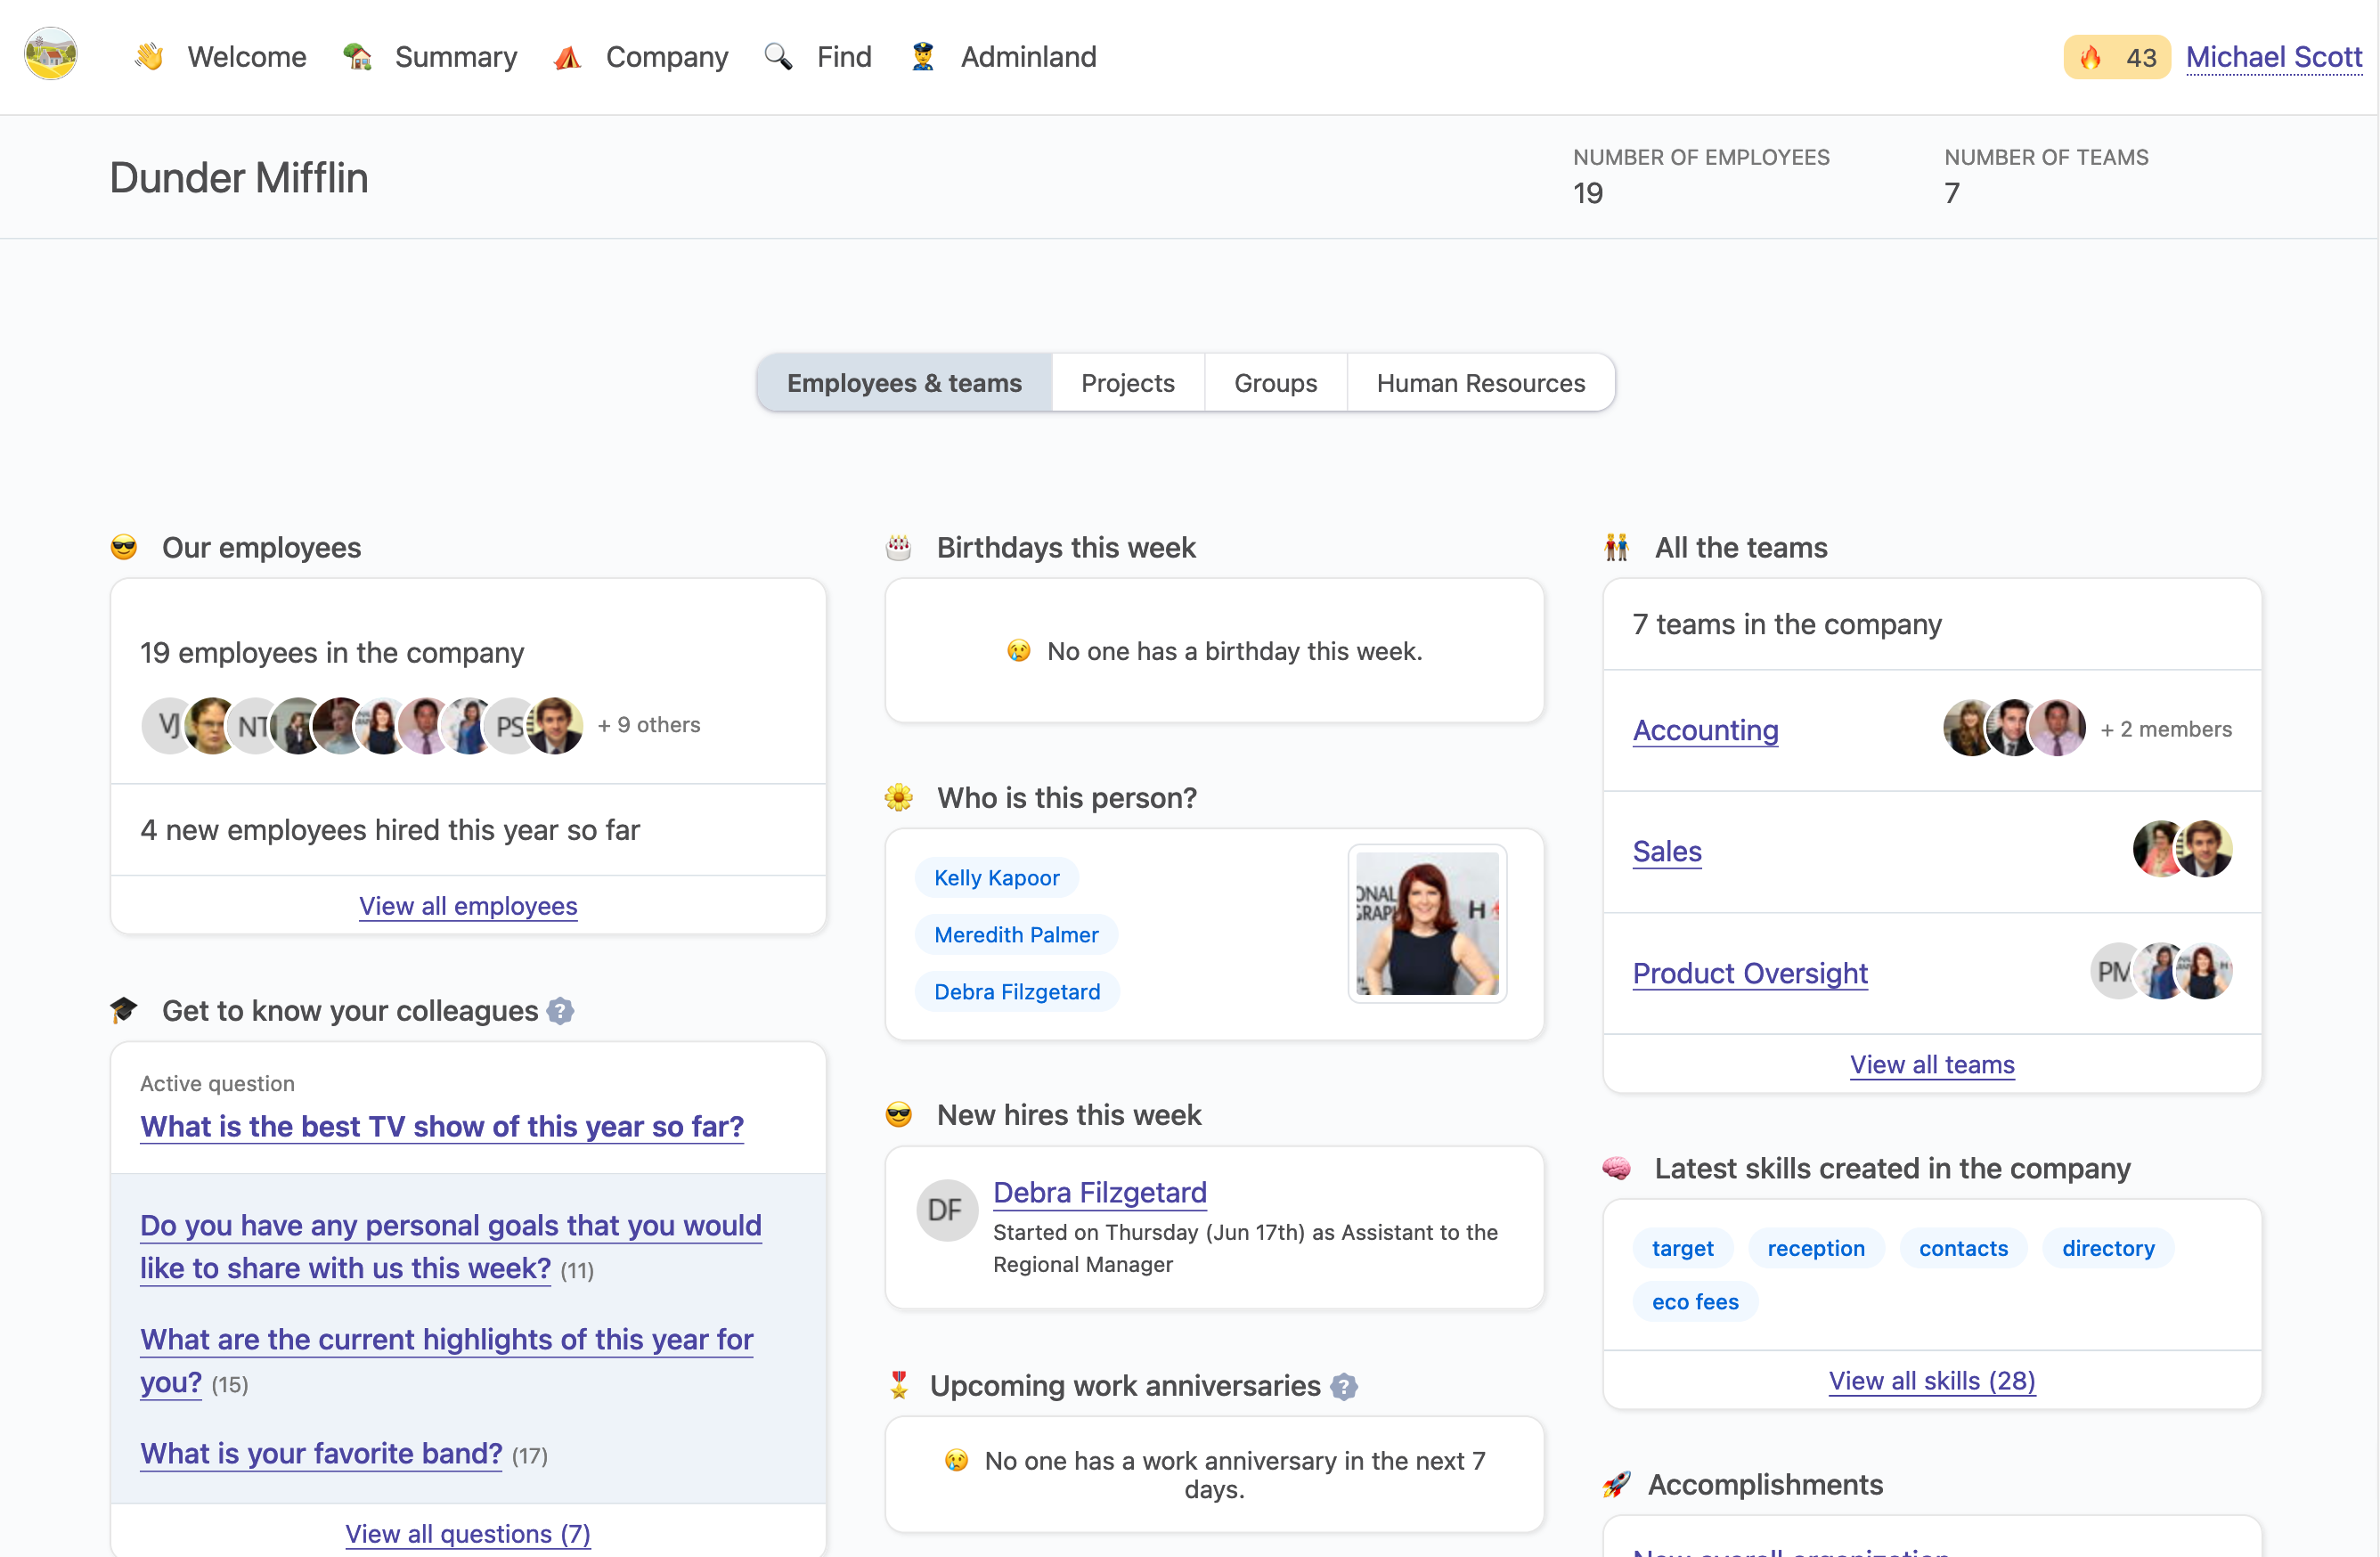
If this date is set in the future, that means the employee will soon join the company. When this date is in the range from now to next week, and if the employee will be part of a team, (s)he will appear on the team’s dashboard so everyone on the team will know someone new is coming, as shown below.
# Work anniversaries
It’s interesting to know when a colleague has a work anniversary. It’s a date to celebrate. Linesbox will warn employees when a work anniversary will occur in the upcoming week. This information is displayed on the team’s dashboard for everyone to see.

# Employee positions
# Overview
A position is the job that the employee does. It can be Software Engineer, CEO or Sales manager. Linesbox provides a simple way of managing positions. There is currently no way to manage hierarchy or seniority in a given position. If your company has the notion of senior something, you will to create two positions: one junior, and another called senior.
Job positions are managed in Settings. Only one job position can be assigned to an employee at any given time.
# Assigning a job position
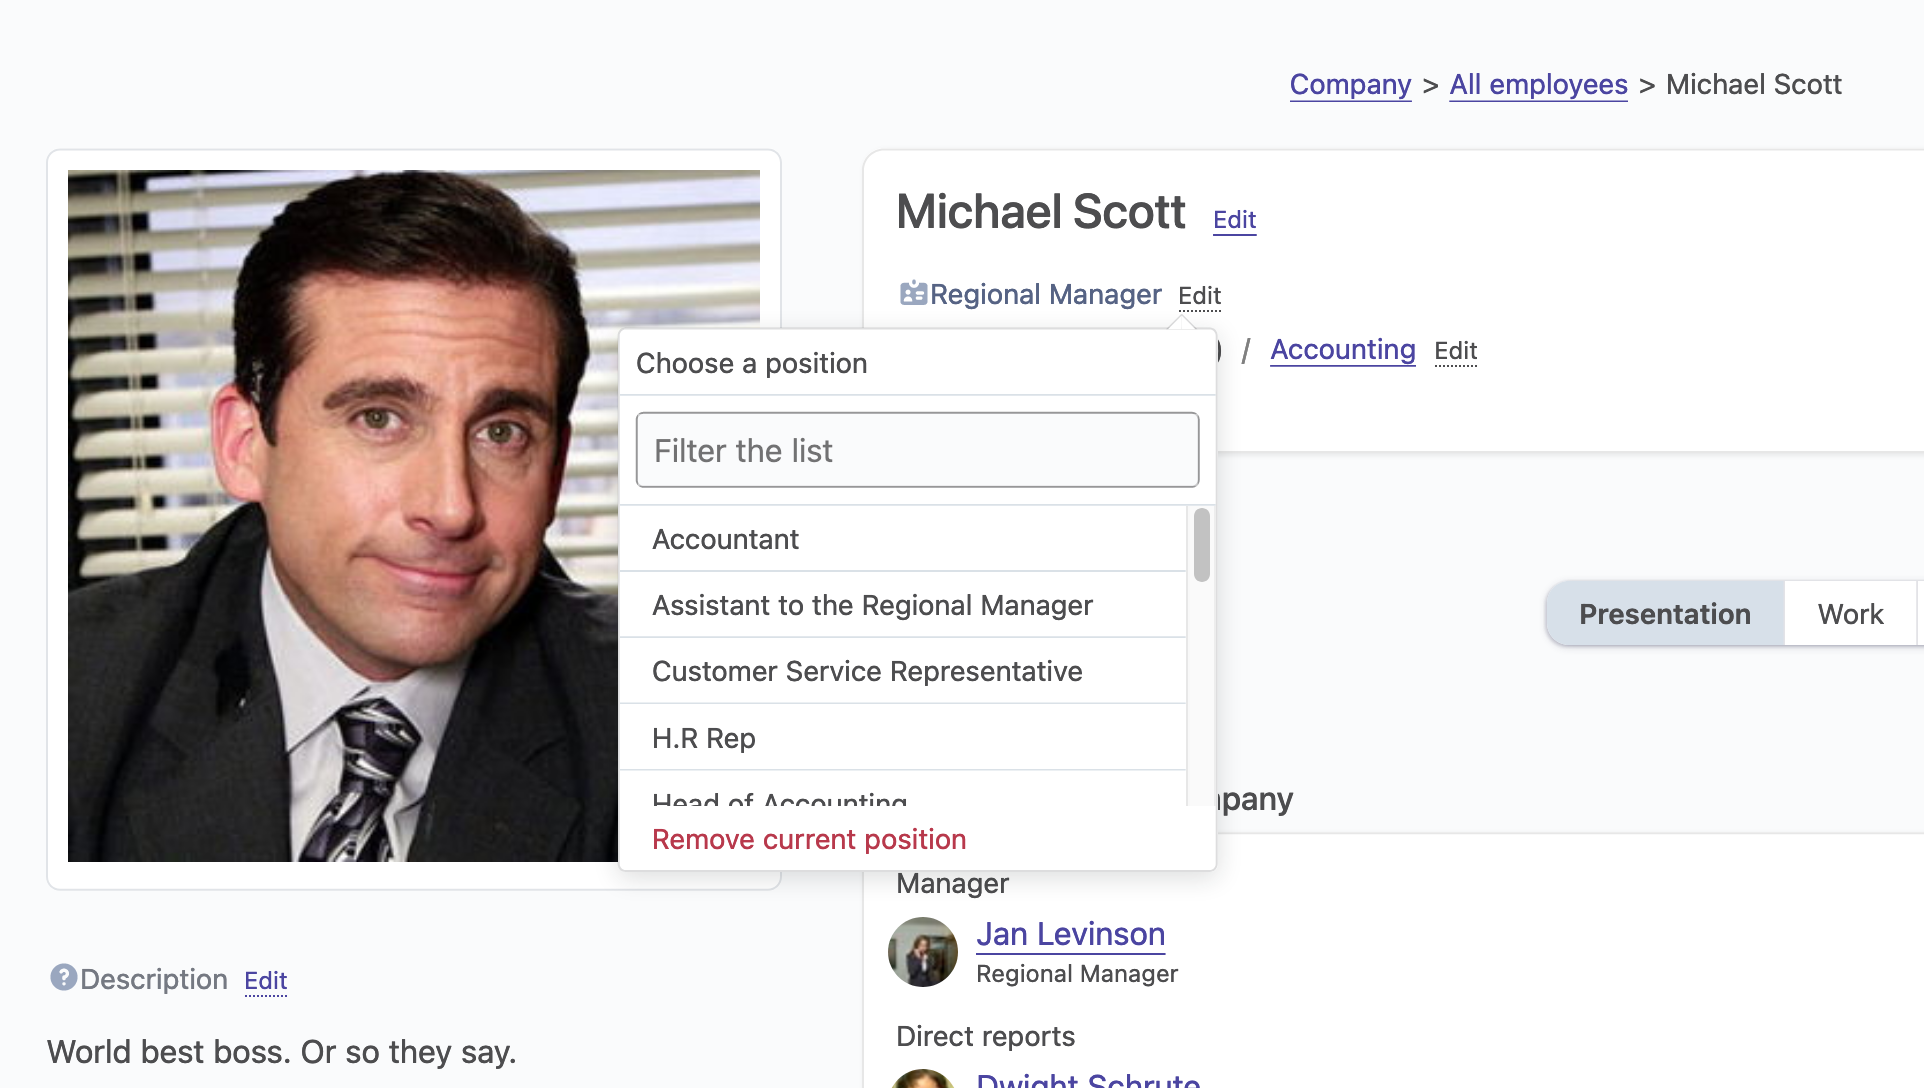
To assign a job position to an employee, you need to go to the employee profile page, and assign it to the employee.
Rules
- Only someone with the HR or administrator role can assign a job position to someone.
- An employee can have only one job position at any given time.
- Everyone in the company can see the job position.
# Viewing the history of job positions
Everytime an employee changes positions, Linesbox will record it in the history of job positions.
This information is public inside the company and can be seen on the employee profile page, under the Presentation tab, as shown below.

As you can see, we also record the years the position was active.
# Managing job positions
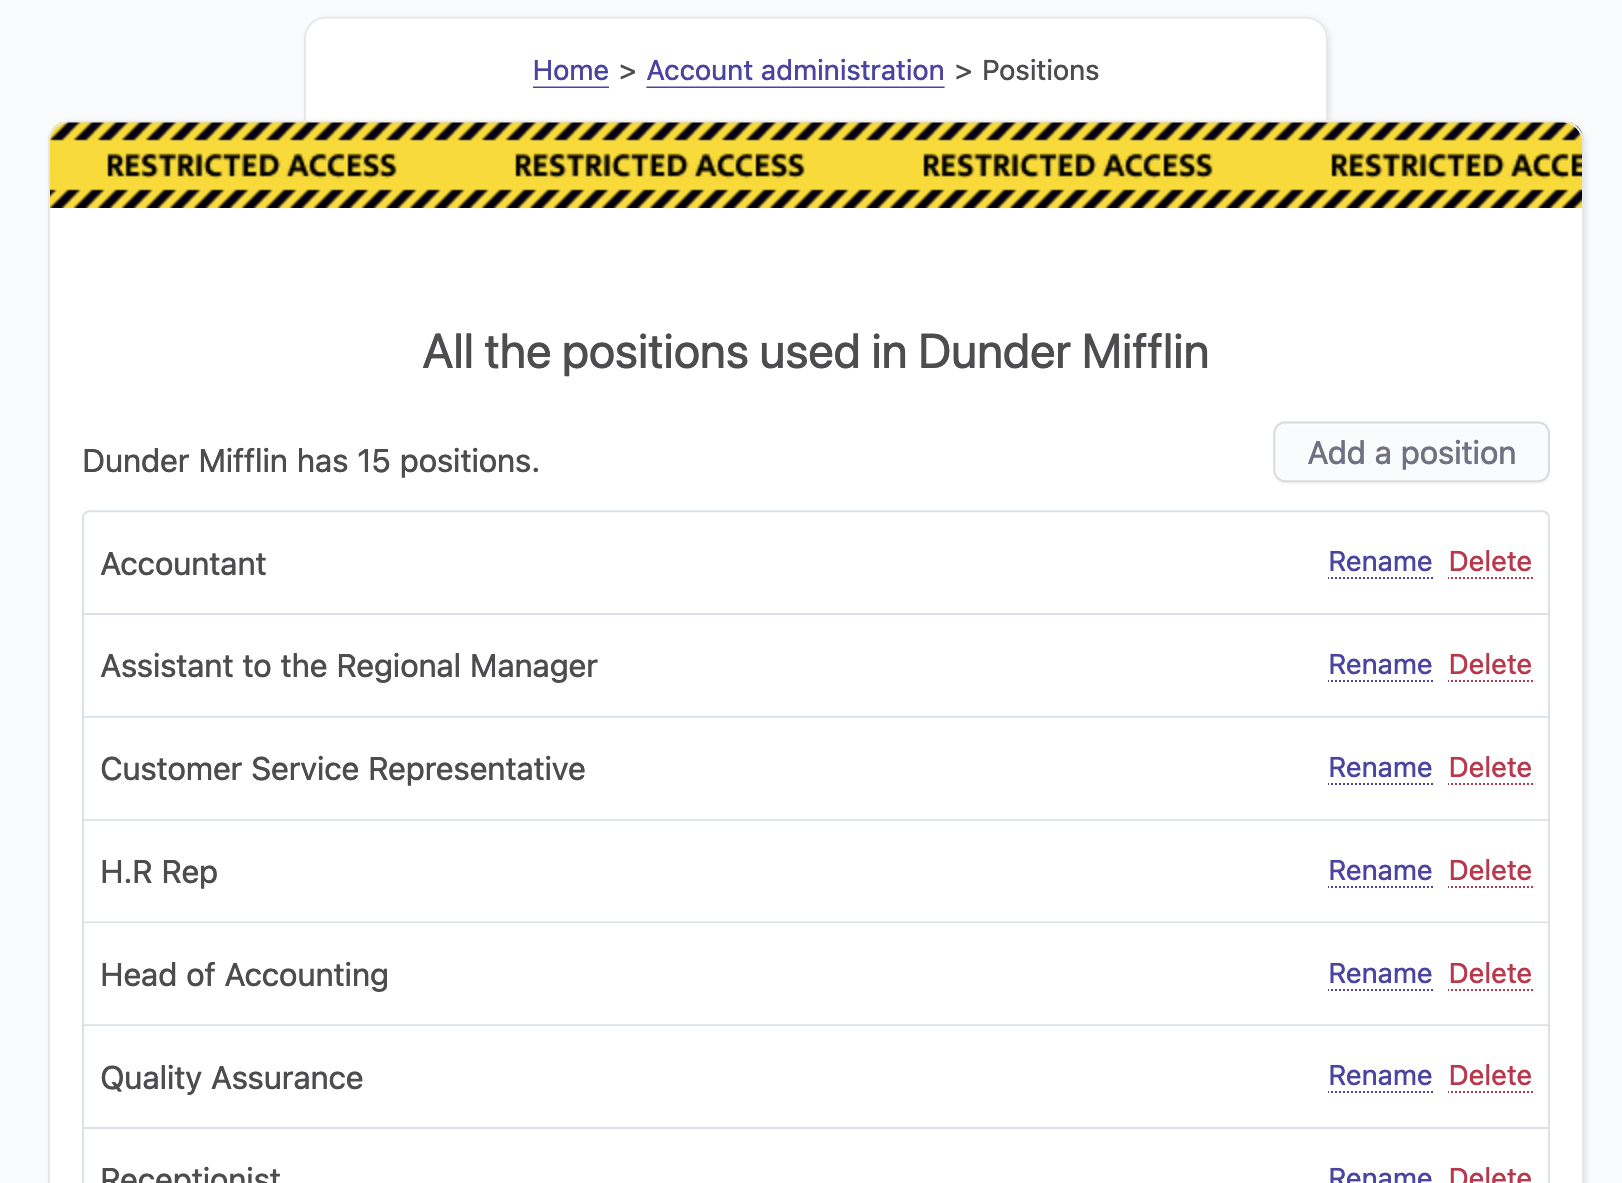
To manage job positions, go to Settings > Add/remove job positions. Here you will find all the available job positions in your company.
# Creating a job position
To create a job position, you only need a title.
Rules
- Only HR and administrators can manage job positions.
- The title of the job position is to 191 characters.
# Renaming a job position
You can also rename a job position. When renaming a job position:
- the change is immediately taken into account,
- employees with this job position will have their profile page automatically updated,
- the job history on the employee profile pages will be updated as well with the new name.
Rules
- Only HR and administrators can rename job positions.
# Deleting a job position
You can also delete a job position. Deleting a job position will
- remove this position on every employee who had this position, leaving them with no positions,
- remove the position from the job history on the employee profile pages.
# Employee statuses
# Overview
In a company, employees can be consultant, part-time or full time employees. This status is what we call Employee Status in Linesbox.
Linesbox will adapt to your company and doesn't assume that there should be any predefined statuses in the company when you setup your account.
You can create as many statuses as needed to reflect your unique situation.
While employee statuses are managed in Settings, assigning a status to an employee is done on the Employee profile page itself. Everyone in the company can see this information, as this should public within the company.
# Internal vs external employees
Linesbox makes the difference between internal and external employees.
- External employees aren’t part of your payroll. This means that instead of a payslip, you will probably be sharing an invoice receipt once a specific project or work duration is over.
- External employees do not require operational expenses. They use their own resources to complete the said assignment, including electricity, internet connectivity, software subscriptions, and the like.
- External employees are free to take up second or even third jobs.
We use this notion inside Linesbox for several purposes, like manage the renewal contract date of the consultants for instance.
This internal/external status can be changed anytime.
# Creating or updating an employee status
Employee statuses are created in Settings.
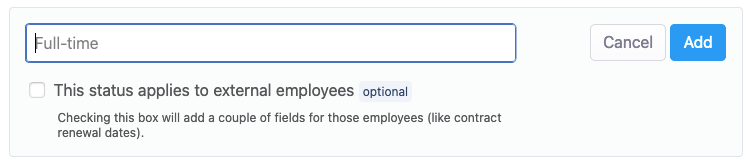
To add an employee status, click on the Button at the top of the page, and fill in two important pieces of information:
- the name of the status itself. This is internal to your company, so it’s really up to you,
- whether employees who will be associated with this status are internal or external employees.
Once created, the status will be immediately available to be assigned to employees.
When a status is updated, the change will be immediately taken into account. If a status previously was used for external employees and is now used to manage internal employees instead, any information that was depending on the external status will be kept in the database - they won't be deleted, only not shown to the employees.
Rules
- Employees can have only one employee status at a time.
- The name of the employee status is mandatory and limited to 255 characters.
- By default, employee statuses are for internal employees.
# Deleting an employee status
Deleting an employee status is done in Settings as well. Deletion takes effect immediately, so proceed with caution.
# Assigning an employee status
Assigning an employee status to an employee is done on the Employee profile page.

Rules
- Only employees with the RH and administrator privilege have the right to assign a status to an employee.
# Managing external employees
# Overview
External employees (as defined here) have some special information attached to them in Linesbox:
- the contract renewal date,
- the rate they charge the company.
These two information are displayed on the Employee’s profile page, but only if the employee who views the profile of the consultant is:
- the employee him/herself,
- the manager of the employee,
- an employee with either the HR or administrator privilege.
This is how the information is displayed on the Employee profile page.

# Managing the contract renewal date
External employees sign a contract with the company and this contract has a specific duration. This is what we call the contract renewal date. After this date, the contract ends. In some companies it’s really important to be notified of this date in advance.
Once set, the contract renewal date will appear on the Employee profile, but only selected people will be able to see it: the employee himself, the manager of this employee and anyone with the HR or Administrator role. No one else in the company will be able to see this information.

Rules
- This information will only be shown if the employee is associated with a status of the External type.
# Editing the contract renewal date
Linesbox lets you change this date on the Employee profile page, as shown below.
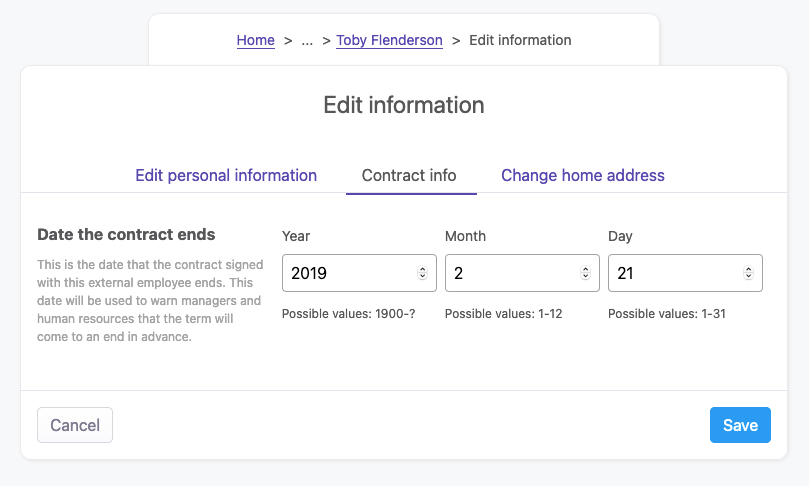
Rules
- This tab in the Edit employee profile page will only be shown if the employee is associated to a status with the External type.
- Only employees with the HR and administrator role are allowed to edit this information.
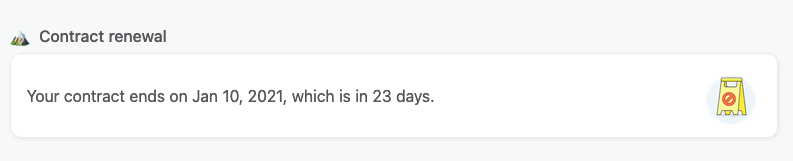
# What happens when the contract renewal date is due
When the contract renewal date is set, and that the contract will have to be renewed soon, Linesbox will warn several persons in the company.
First, it will inform the external employee himself, as this information will be put on the dashboard when the renewal date is 30 days (or less) away.
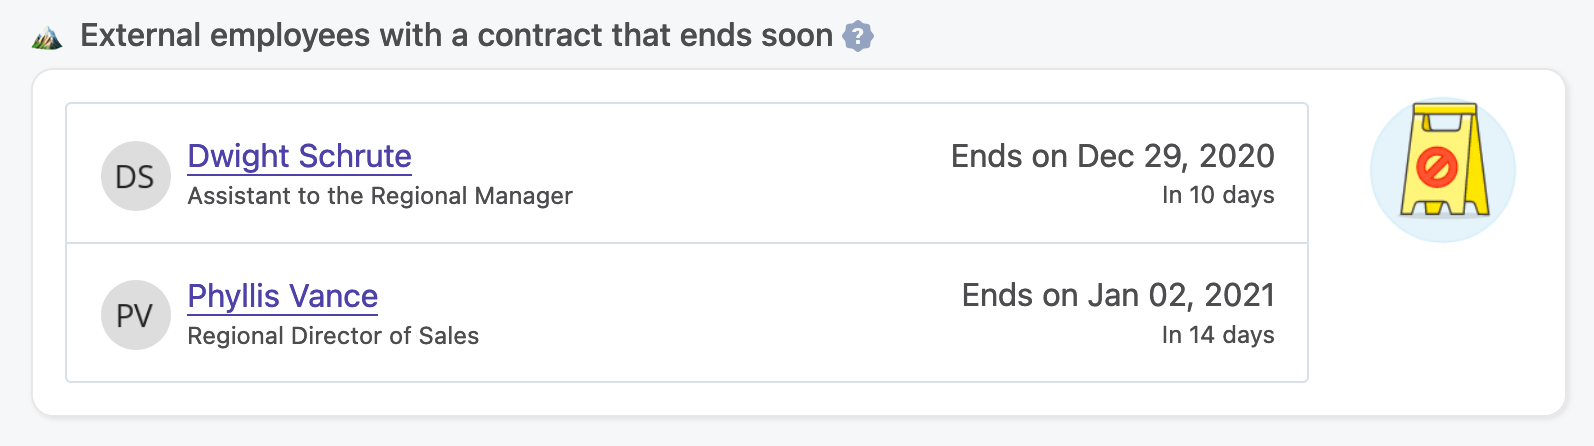
Then, it will inform the manager(s) of this employee on their manager dashboard if, again, the renewal date is 30 days (or less) away.
# Managing the rates
External employees always charge a rate for their expertise. Linesbox lets you define a rate for each external employee, and this rate will be used to calculate the costs of projects directly.
Rates are expressed hourly (ie. 160 USD per hour).
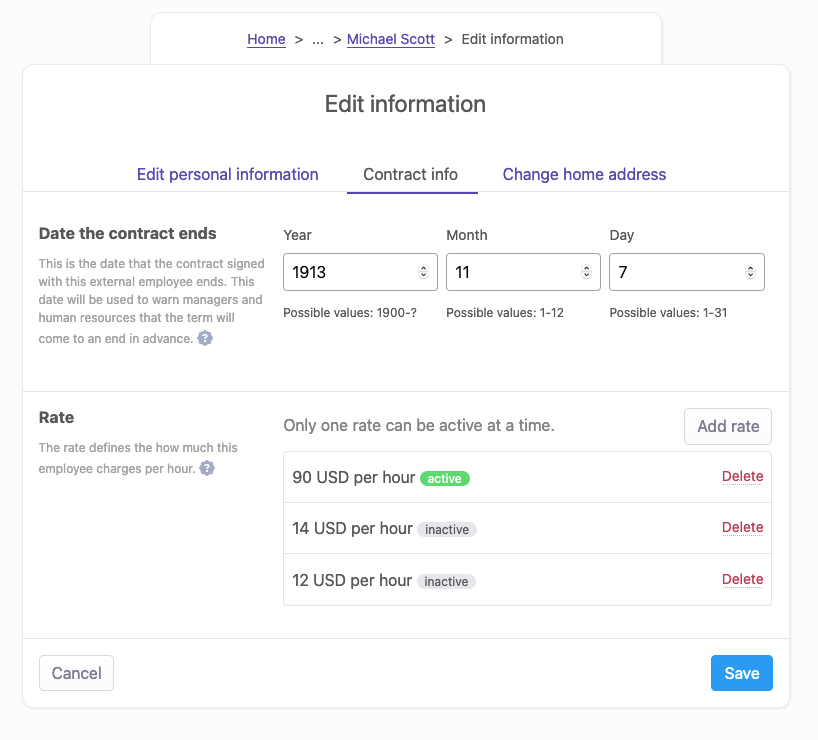
Rules
- Rates should be a number (without decimals) from 1 to 10000.
- Only one rate can be active at any time.
# Adding a new rate
To add a new rate, click on the big Add rate button at the top.
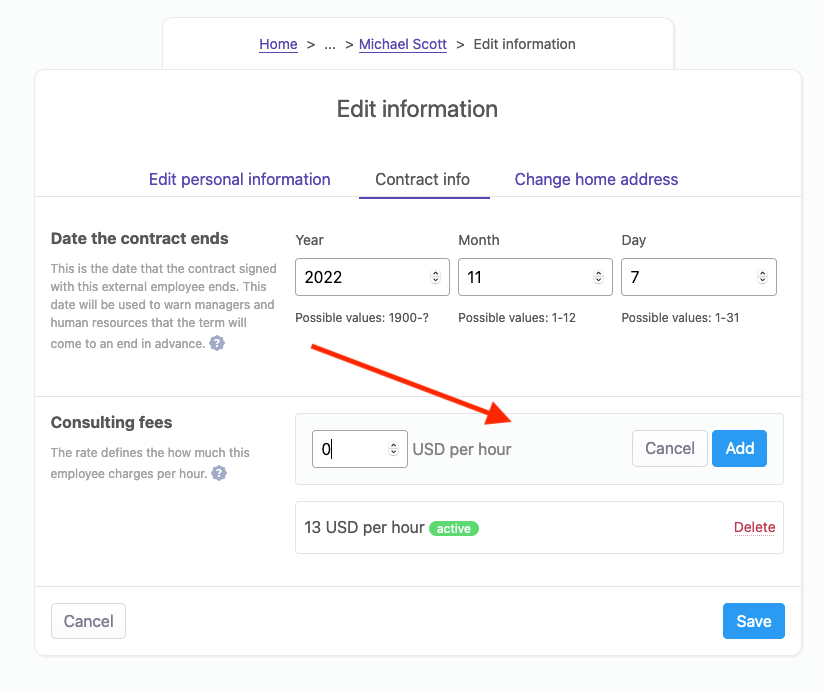
This will add a new rate and set it to active. That means it will immediately be the new rate that will be taken into account every time the employee will enter his/her time tracking information on his/her timesheets or project tasks. This won’t affect existing time tracking entries at all.
# Deleting a rate
To delete a rate, click on the Delete button next to the rate you want to remove from the system.
Very important note: deleting a rate won’t affect past timesheets and project costs that were calculated in the past.
# Work from home
# Overview
Working from home becomes more and more common nowadays. When working from home in a non-remote company, letting your colleagues know that you are not physically here is really important. Linesbox facilitates this entire process.
# How to indicate that we work from home
An employee can indicate that (s)he will work from home by checking the checkbox on the Employee dashboard.

# On the dashboard's team page
Employees who are part of a team can see if other team members are working from home straight from the team's dashboard.

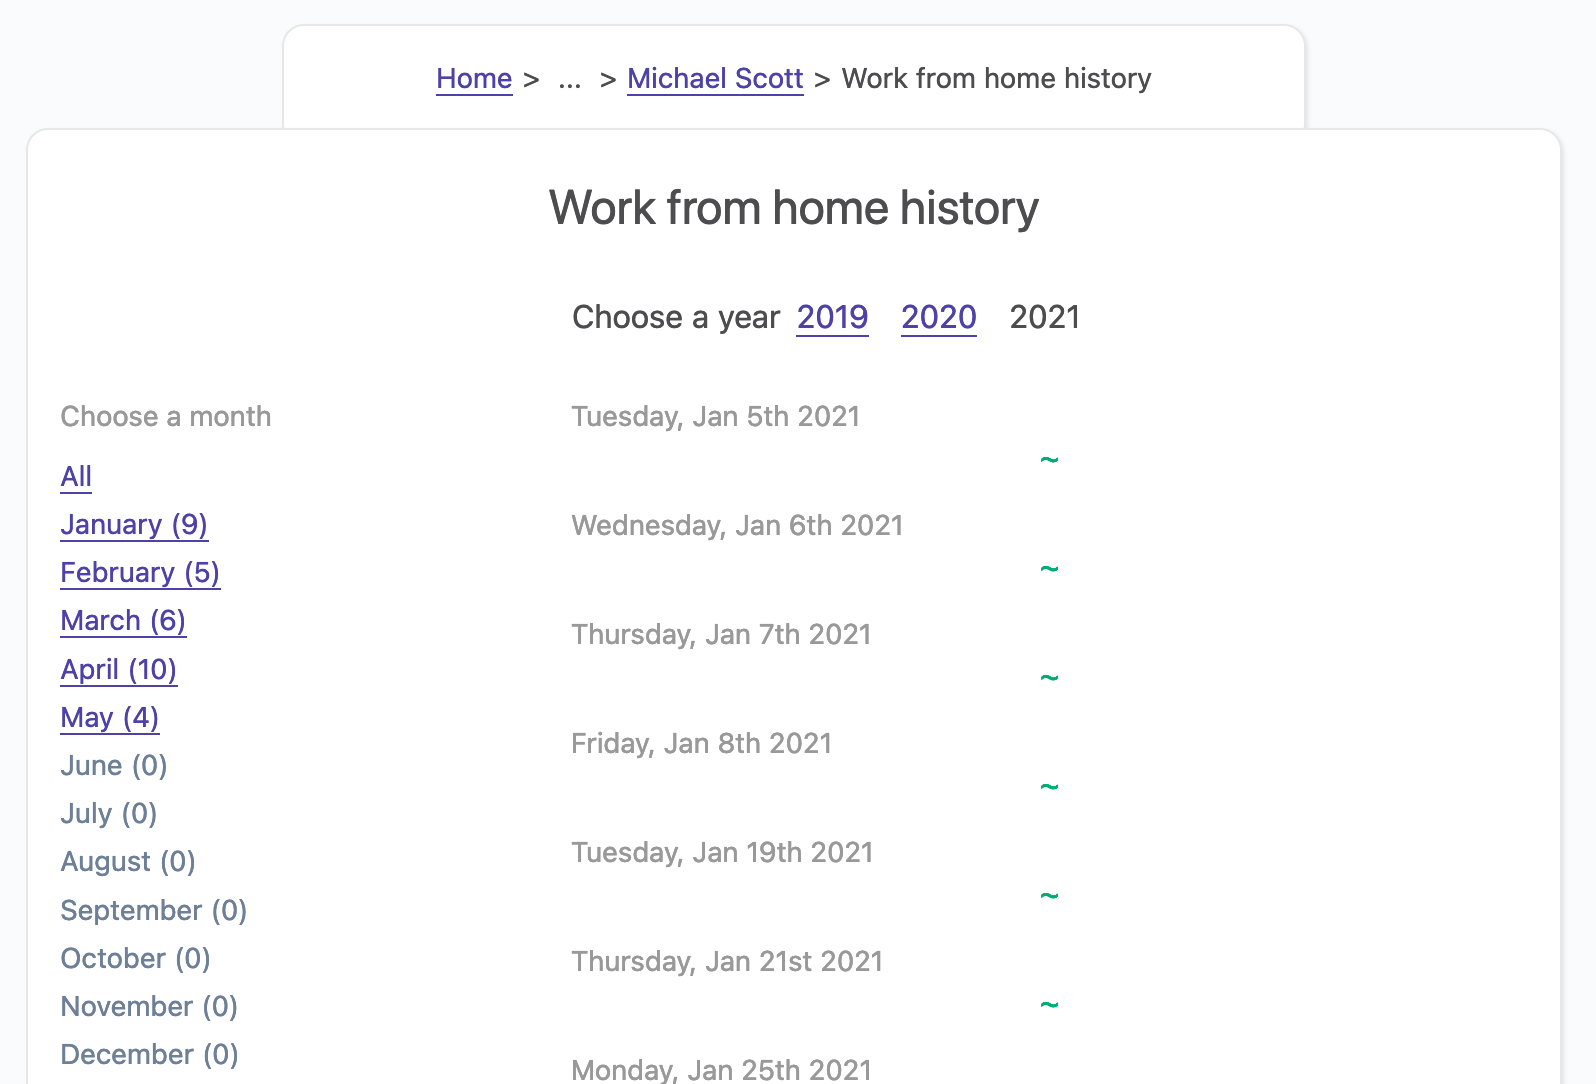
# On the employee's profile page
On the employee's profile page, we can also see if an employee currently works from home on the day or not.

You can also consult the history of work from home by clicking on the View all button. This gives the complete listing of every time the employee has indicated (s)he has worked from home in the past.
# Toggle the feature in the company
Some companies are fully remote. In this context, it makes no sense to let employees know when they work from home. You can disable this feature entirely in Settings, by choosing Settings > Manage work from home and disable the feature, as shown below.
Once disabled, employees won't see previous entries if the feature was once enabled.
# Employee morale
# Overview
As humans, we have good days and bad days. A lot of factors affect how we feel, and ultimately, how we perform at work. Linesbox wants to help take the pulse of the teams, while respecting the privacy of employees.
Employee morale will appear at several places throuhgout Linesbox:
- On the employee profile page itself,
- On the team page if the employee belongs to a team,
- On the employee dashboard,
- On the company page.
# On the employee dashboard
An employee can indicate how (s)he feels every day, on the dashboard.
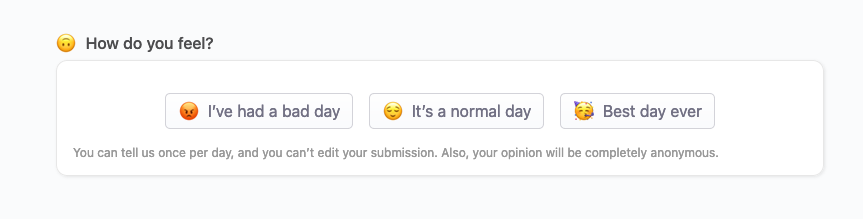
TIP
- Only the employee can give information on his/her morale. No one else, even with the Administrator role.
- Employees can indicate their morale only once per day. This is reset at midnight every day. Once they have voted, they will have to wait the next day to vote again.
# On the team page
If the employee belongs to a team, his/her morale will be displayed on the team page. Read more about it on the team documentation.
# Skills
# Overview
Sometimes in your job, you have questions about very specific subjects. You know that someone in the company has answers to these questions, but you have no idea who. Each employee has a specific set of skills, or knowledge. It can be about PHP, or how Siemens machine work, or kitchen pricing strategies. So you end up asking around and hope that someone knows somebody who can help you.
Skills in Linesbox are here to solve this problem. Employees can enter their own skills, and everyone in the company can search a specific skill to find all the people who match the skill.
# Browsing skills
You can browse skills in several ways:
- from the employee’s profile: you can click on a skill to browse all employees who have this skill,
- you can finally go on the Company tab and access the list of skills there.
# On the company page
All the skills used in the company are listed on the Company tab. On this screen, skills are listed alphabetically and each one displays the number of employees associated with it.
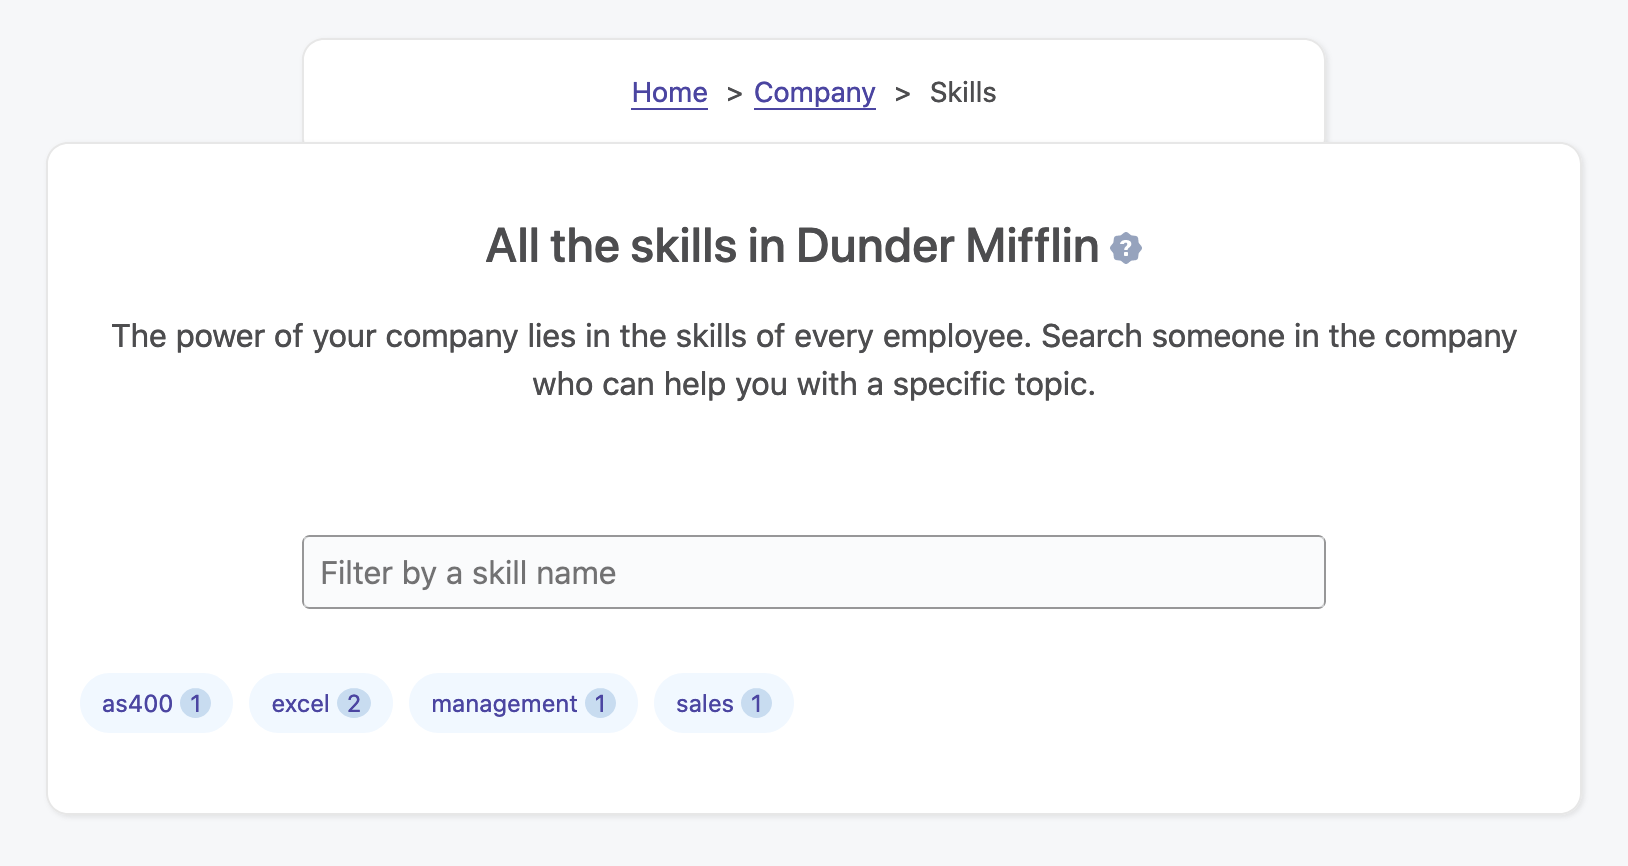
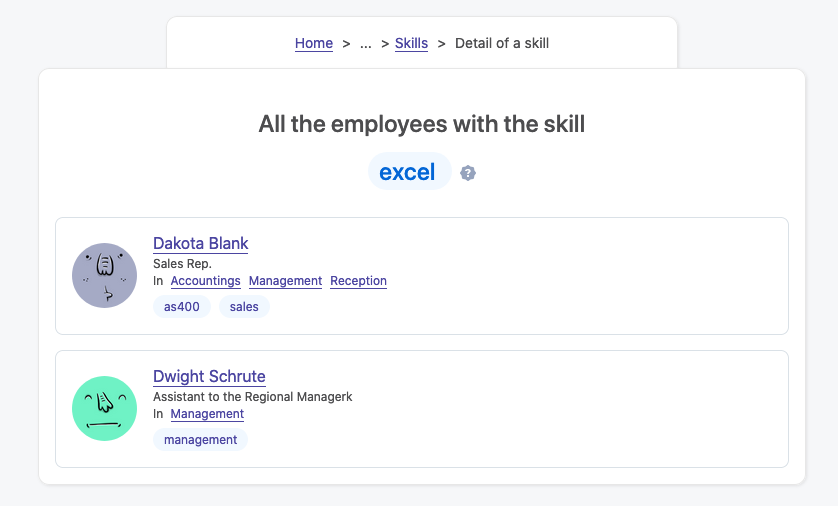
Clicking on a skill leads to the details of this skill, showing all the employees who are associated with it.
# On the employee’s profile page
The skills of an employee are listed on his employee’s page.

# Creating a skill
Creating a skill is easy and happens on your employee’s profile page. Only employees can create a skill, and each employee is responsible for entering his own set of skills. To create a skill, you have to type the skill name, which will either find it from the list of existing skills entered by other employees, or let you create a new skill.
A skill that you create, can also be chosen by another employee on his own profile.
Once created, the skill will be displayed on your profile page.
For the Latin alphabet, accents will be automatically removed from the skill name (accents like é, õ), and words will be saved as lowercase. For example, Météo will be saved as meteo. Why? As skills can be created by anyone in the company, it could be very easy to have the same word with a different case, or for non-English words, to create two words from the same word, but with different accents. By removing accents and putting words in lowercase, we increase the chance that people will find the skills they are looking for.
Rules
- A skill can only be created by the employee.
- someone with either the HR or administrator role can also add a skill to an employee employee’s profile to delete a skill.
- The name of the skill is mandatory and limited to 255 characters.
- Accents (for the Latin alphabet) will be automatically removed from the name.
- Upon saving the skill, it will be converted to lowercase automatically.
# Updating a skill
On your employee’s profile page, you can’t update a skill. In order for you to update a skill, you need to remove it from the list of your skills and create a new one.
That being said, an administrator can update the name of a skill from the list of skills in the Company tab. When changing this name, it will be reflected everywhere.
Rules
- Only someone with the HR or administrator role can edit a skill.
- Accents (for the Latin alphabet) will be automatically removed from the name.
- Upon saving the skill, it will be converted to lowercase automatically.
# Deleting a skill
You can remove skills from your profile anytime. To remove a skill, you need to toggle the Edition of the skills by pressing the button on your profile, and select the skill you want to remove. Changes will be instant.
If you were the only one employee with this skill in the company, and if you remove it from your profile, the skill itself will be permanently deleted from the system and won’t be searchable anymore – at least unless someone re-creates it.
There is an exception though: an administrator can delete the skill from the list of skills. Doing that will remove the skill for all employees.
Rules
- The employee can remove his own skills from appearing on his profile.
- Someone with either the HR or administrator role can also edit an employee’s profile to delete a skill.
- Someone with either the HR or administrator role can delete a skill entirely from the list of skills in the Company tab.
# Expenses
# Overview
In some companies, employees have the right to buy stuff on behalf of the company. They can invite clients to the restaurant. Buy a book to learn a new skill. Go to a conference. You name it.
It’s well-known that managing expenses is a pain, in general, for the employer and the employees. It’s either done on a spreadsheet, or with the help of extremely expensive and complex tools like Acumatica or Concorde. We can do better, and simpler. The Linesbox way, basically.
Linesbox makes it really easy for employees to record an expense, and for the employer to manage those expenses. Even more importantly, it also allows for a very strict internal audit, necessary for most companies. Your accountant will be happy.
# Creating an expense
Employees are responsible to log their expenses. In real life, employees want to be reimbursed as quickly as possible, and Linesbox lets companies achieve this goal efficiently.
Expenses are logged on the employee’s dashboard. Anyone can log an expense, but no one can log an expense on behalf of someone else.
Privacy
Expenses are private. No other regular employees can see them, except
- employees with HR or administrator roles,
- the manager of the employee,
- the employee himself.
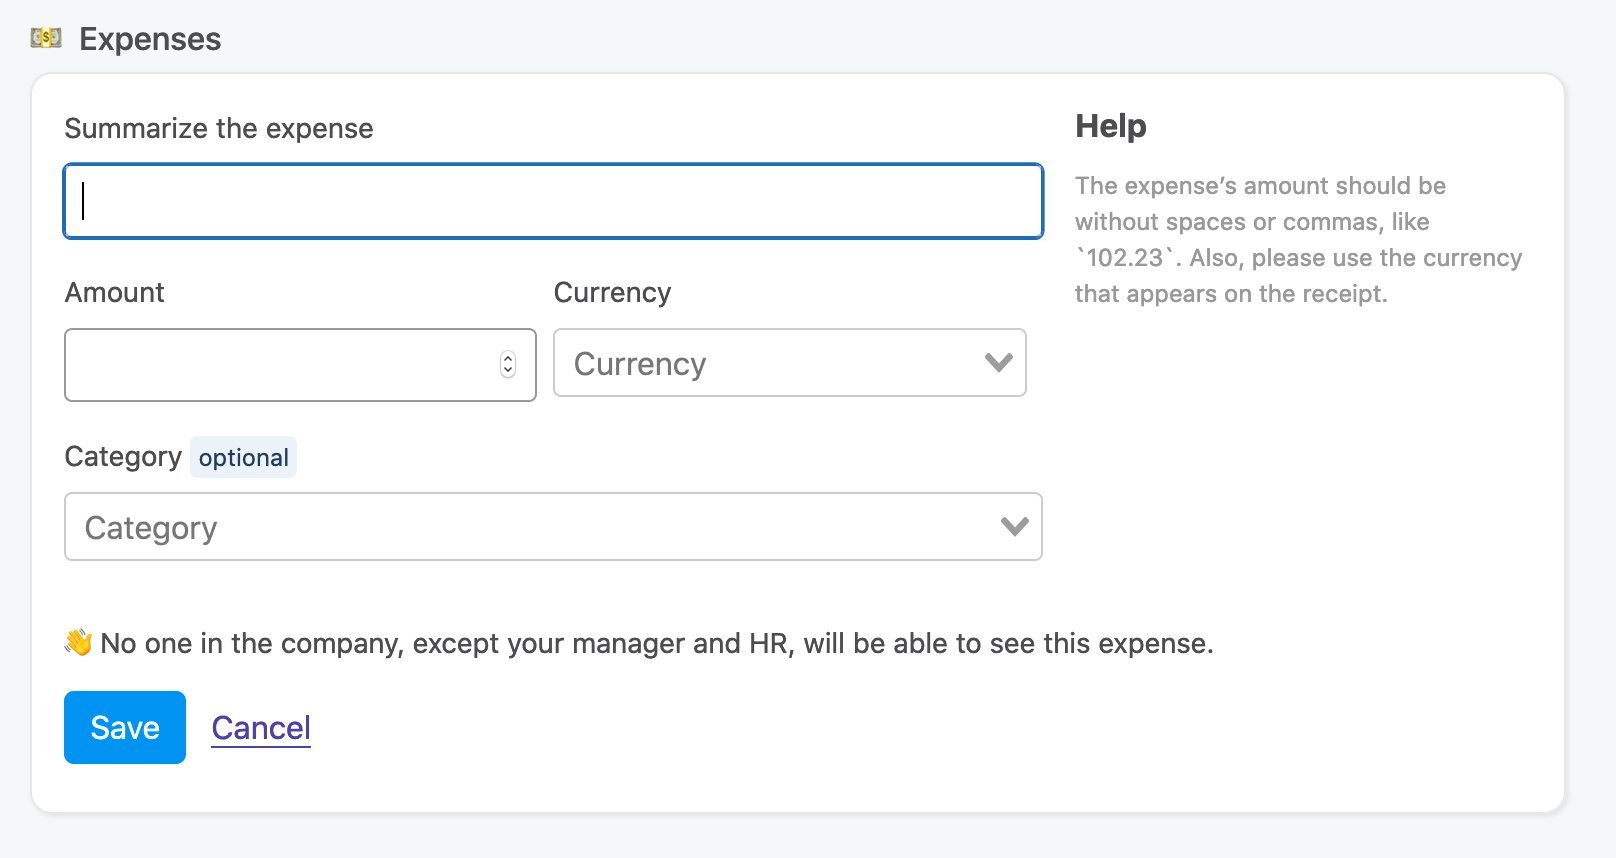
To create an expense, a few fields have to be filled:
- the amount, along with the currency,
- the date,
- the category of the expense.
Rules
- All employees can log an expense.
- Only a manager can approve an expense of an employee.
- Only employees with either the HR or administrator role can approve an expense already approved by a manager.
- The amount has to be a number. We support both comas or dots in the number, and spaces are allowed too. The amount is stored as cents in the database.
- The currency is mandatory and comes from a list of pre-configured list that can’t be changed.
- The category is optional but highly recommended.
# Expense currency
Your employees can travel and therefore the expense can be charged in a different currency by the one supported by the company.
Every amount entered in Linesbox is converted to the company's currency, but we always keep the original currency along with the original amount in the database. The expense’s amount is always displayed in the original currency, but if we needed to convert it to the company’s currency, we will also display the converted amount next to it.
When the employee enters an amount with a currency that is different from the company’s currency, Linesbox will automatically convert it using the company’s currency, at the exchange rate that was in place at the date the expense occured.
If you change the currency of the company, we will recalculate all the converted amounts used in the company to match the new currency – however we will use the rate that were effective at the date the expense occured. Depending on the amount of previous expenses in your company, this process can take a long time, so please patient.
# Viewing expenses
Expenses can be seen in different places:
# Expense categories
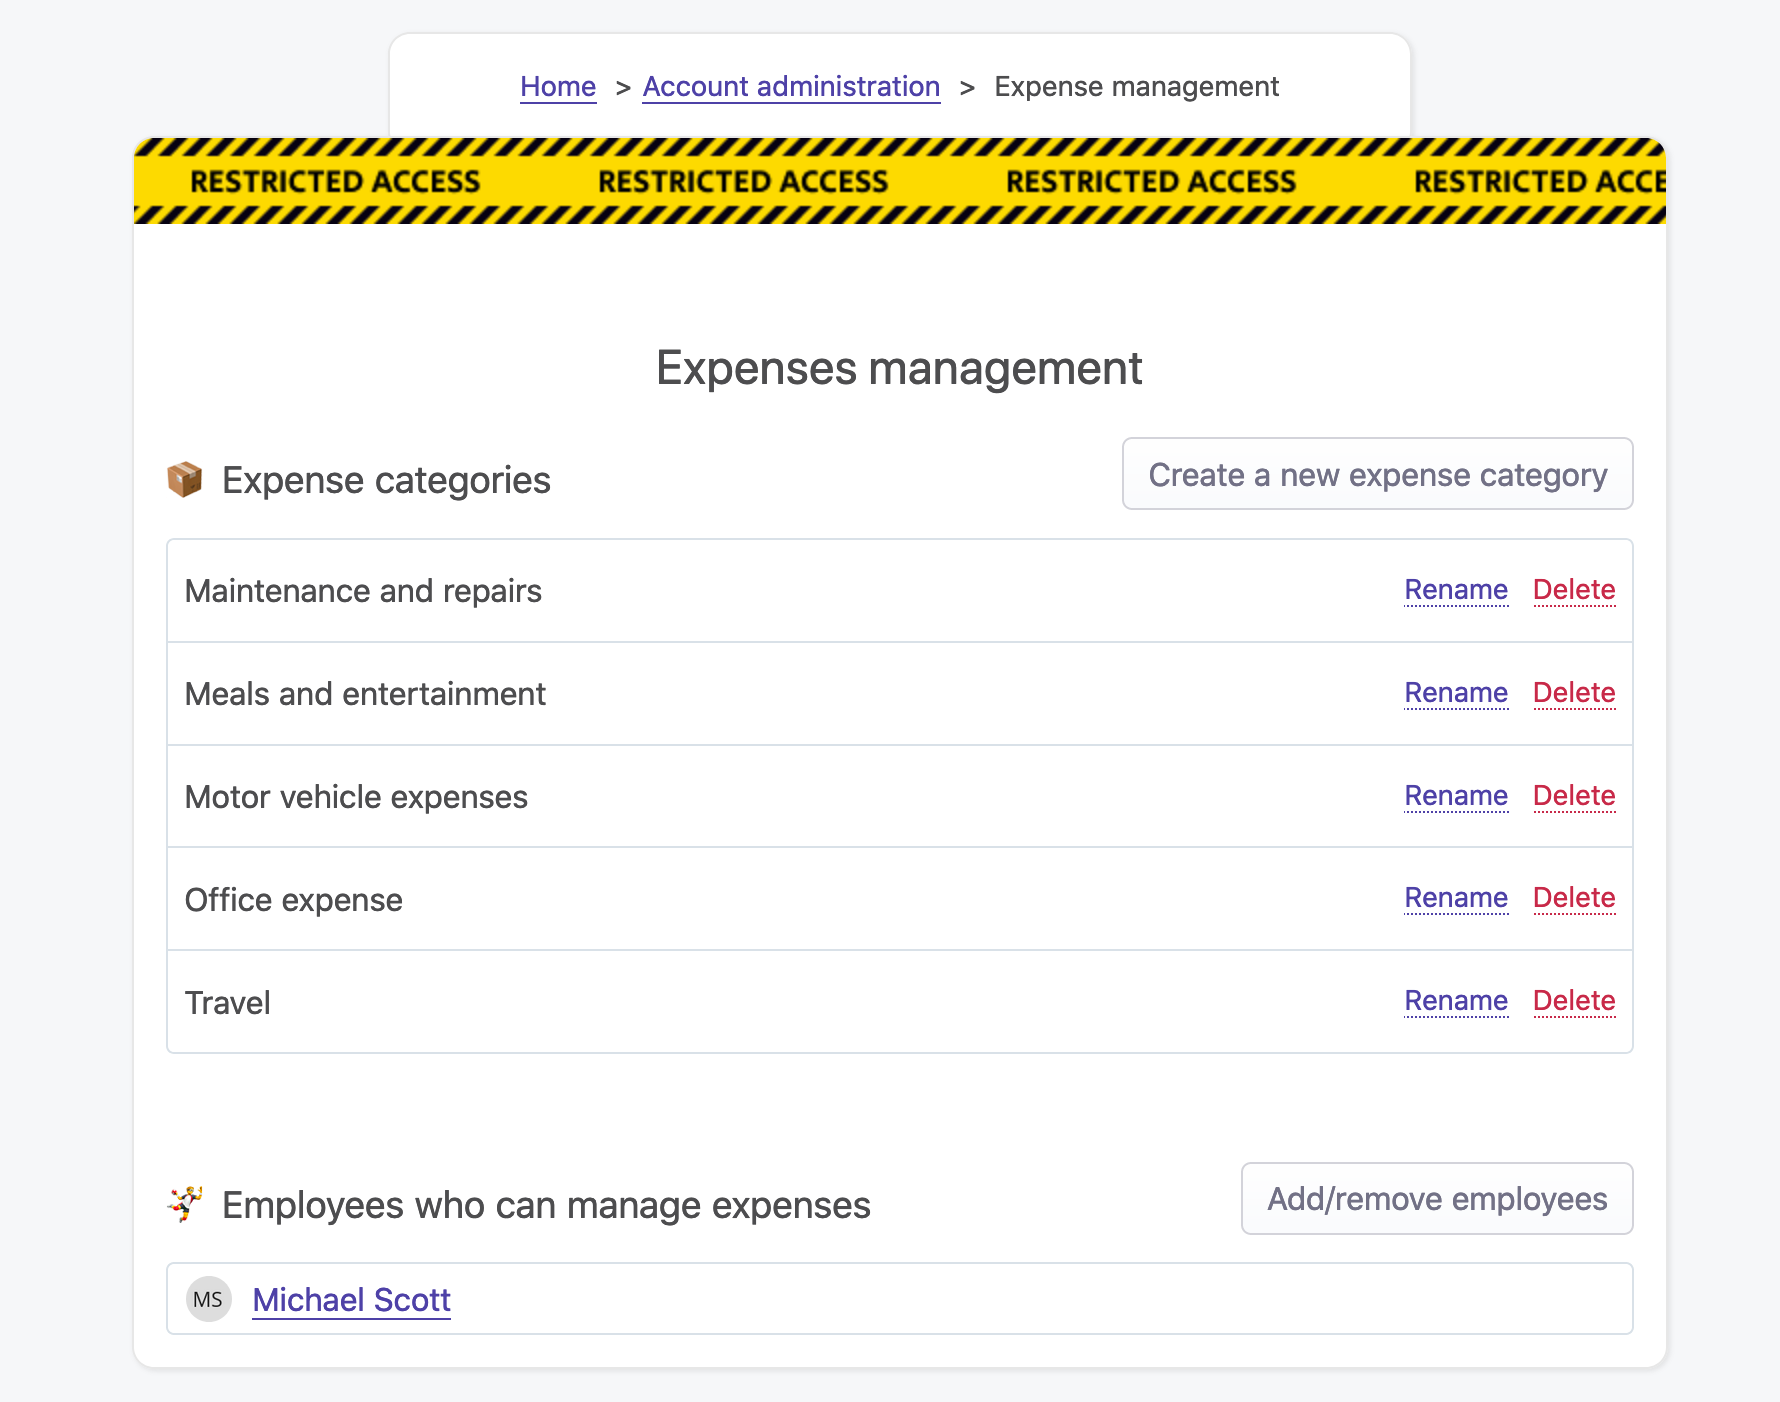
Expenses can be classified into categories. A category (sometimes called GL) represents a type of expense. Linesbox comes pre-configured with the following categories:
- maintenance and repairs,
- meals and entertainment,
- office expense,
- travel,
- motor vehicle expenses.
You can change the names of the categories, delete them or add new ones at anytime.
An expense doesn’t necessarily have to be associated with a category, but it’ll be much easier accounting-wise if it’s associated with one upon creation. When an expense doesn’t have a category, it’ll be put in the Uncategorized category.
# Creating an expense category
Creating an expense category is done in Settings.
Rules
- The name of the category is mandatory and limited to 255 characters.
# Updating an expense category
Updating an expense category is done in Settings.
Rules
- The name of the category is mandatory and limited to 255 characters.
# Deleting an expense category
Deleting an expense category is done in Settings. When a category is deleted, all expenses linked to this category will be moved to the category called Uncategorized – which is a category that can’t be deleted. This is necessary as we need to find a way to find all those expenses back.
Before deleting a category, you also have the option to move all the expenses linked with this category to another category.
Rules
- Only employees with either the HR or administrator role can delete a category.
`